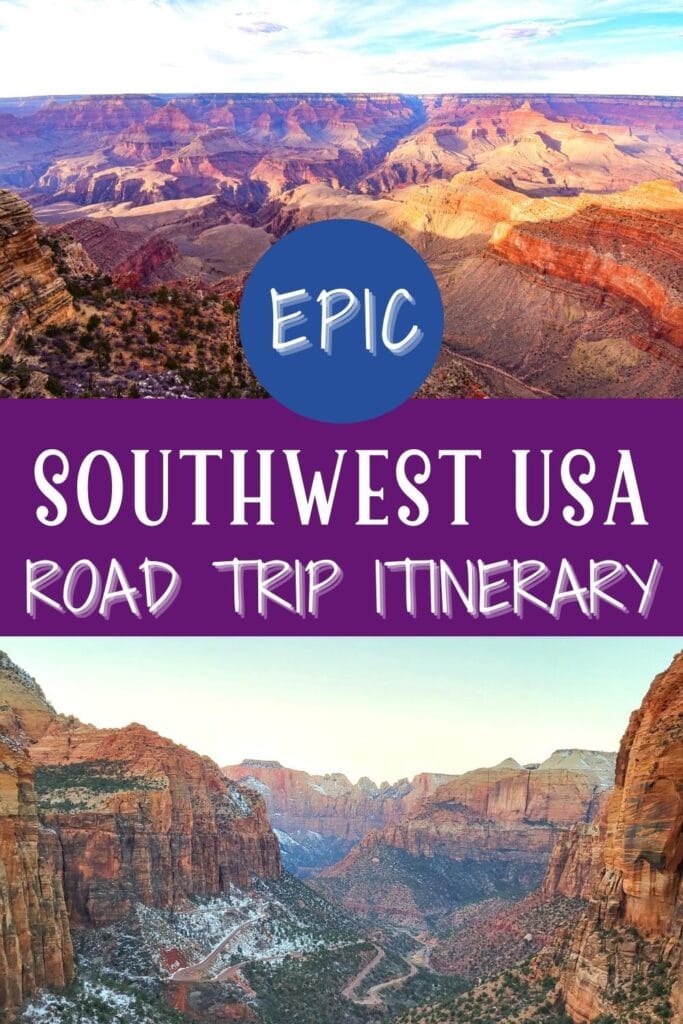
Epic 7 Day Southwest Road Trip Itinerary
Exploring the American Southwest for the first time is mind-blowing. This landscape is like nothing you’ve ever seen. Side note: Is this how westerners feel when they visit the East Coast and see all the green forests for the first time?
We took a week to explore this region, and buddy, did we ever explore it. Including mandatory first-time visits to Zion, Bryce Canyon, and Grand Canyon, we crammed in 7 more national parks and other must-see sights for good measure.
If you’re looking for the perfect introduction to this stunning desert region, this 7 day Southwest road trip itinerary is for you!
This post may contain affiliate links. As an Amazon Associate and associate of other programs, I earn from qualifying purchases. This means if you click a link and make a purchase, I may earn a commission at no extra cost to you.
7 Day Southwest Road Trip: Itinerary at a Glance
Here’s the quick and dirty itinerary if you’re just looking for inspiration.
Besides Las Vegas, this Southwest USA road trip hits 4 national parks, 1 national conservation area, 1 national recreation area, 1 national monument, 1 slot canyon, 1 state park, and 1 really big dam.
- Death Valley National Park
- Red Rock Canyon National Conservation Area – Valley of Fire State Park
- Zion National Park
- Bryce Canyon National Park – Horseshoe Bend
- Antelope Canyon – Horseshoe Bend – Lake Powell
- Grand Canyon National Park
- Walnut Canyon National Monument – Hoover Dam
Of course, the beauty of this itinerary is it’s flexible.
We recommend making this a 9 day trip: Fly out to Las Vegas Friday after work, spend Saturday exploring Vegas, do the epic 7 day road trip, and end up back in Vegas for some more down time before flying home the next Sunday.
This is not slow travel. This is definitely a go-go-go itinerary that only requires 5 vacation days.
You will not see everything there is to see, but you will see a lot of amazing sights in all of these parks. You’ll be able to check many of them off your national parks bucket list!
Save This Map: 7 Day Southwest USA Road Trip from Las Vegas
We’re making it easy for you to steal this Southwest USA road trip itinerary!
⭐ Click the star to the right of the map title, and it will save this map to your Google Drive! To see the map legend, click the sliding bar icon to the left of the map title.
Packing List for this Road Trip
Besides needing the standard road trip packing list, we’ve also listed specific items we found indispensable for this Southwest road trip.
We highly recommend you bring the following and keep them handy in the car throughout your trip.
- America the Beautiful Annual Pass: This is the national park annual pass, costs $80, and will pay for itself more than twice over on this trip alone.
- Water, LOTS of water: This is the desert and you always need water, even in the winter.
- Offline maps or a physical atlas: An actual atlas is the safest, but offline maps are handy so long as your phone is alive.
- Sun protection: sunscreen, wide-brimmed hat, sunglasses, etc.
- Camp blanket: Sit and watch a sunset, or sunrise, or have a picnic lunch in the shade.
- Cooler: Nothing will stay cool in your car for long without a cooler, especially in summer, including your chapstick. (Put it in a Ziploc baggie in your cooler, for real.)
- A light jacket: Elevation change = temperature change. The higher you go, the cooler it gets. Also, the desert gets cold at night.
- Hiking boots: Through dirt, mud, ice, or snow, or something like that…
- Wide angle lens: DSLR fans will know what I mean. This is for Horseshoe Bend specifically but handy elsewhere as well.
- Hiking backpack with comfortable shoulder straps: You need to bring water with you whenever you leave your car, and water gets heavy, so make sure you’ve got cushy straps. Hiking with the 10 Essentials is never a bad idea, either.
One Week Southwest Road Trip from Las Vegas
Let’s break down the road trip itinerary by day.
We’ll give suggestions for things to do in each location, recommendations for where to eat, a head’s up on anticipated costs, tips to look out for, and where to overnight so you’re ready for the next day.
Get an America the Beautiful Annual Pass for this trip! Whether you buy it from a local park near you, at an REI store, or at Death Valley on your first day, this pass is going to save you A LOT of money.
We’ll keep track of exactly how much money it’s saved you as we go through the itinerary, but the punch line is it pays for itself more than twice over on this one week trip alone.
And it’s valid for a year, so who knows what other national park shenanigans you can get up to in that time!
Day 1 – Day Trip to Death Valley National Park
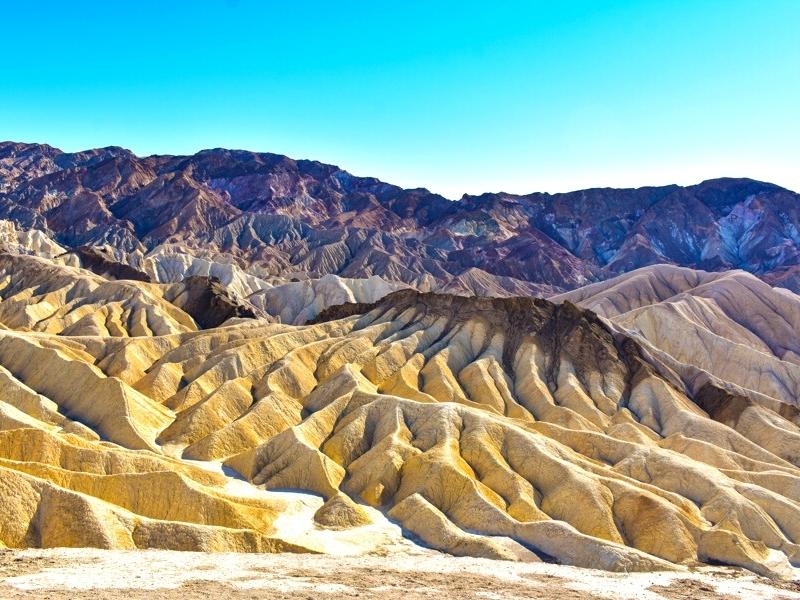
What to Do in Death Valley
- Drive from Vegas – 2 hours
- Zabriskie Point
- Furnace Creek
- Mesquite Flat Sand Dunes
- Artist’s Palette
- Devil’s Golf Course
- Badwater Basin
- Drive back to Vegas – 2 hours
There are a lot of things you can do in Death Valley National Park, but the above list is ambitious for a single day trip, especially if you visit in summer when temperatures soar!
This is the hottest, driest, and lowest point in North America. Don’t underestimate how quickly you’ll get dehydrated or develop heat stroke.
Where to Eat in Death Valley
Packing in a lunch is the easiest option because you can eat whenever you’re hungry, no matter where you are in the park.
Alternatively, Stovepipe Wells has the Toll Road Restaurant.
Entrance Fees/Cost for Death Valley
The Death Valley entry fee is $30 per vehicle and is valid for 7 days.
We strongly recommend an America the Beautiful National Park Annual Pass instead. It will pay for itself almost twice on this road trip alone.
>> Money Saved by the America the Beautiful (ATB) Pass So Far: $30
Tips for Death Valley
- Bring LOTS of water and sun protection. There’s absolutely no shade in this park.
- Download offline maps before you leave Las Vegas.
- There’s basically no cell service out here. Consider putting your phone into airplane mode when you arrive at the park so it doesn’t drain the battery looking for service all day.
Where to Spend the Night
Return to Las Vegas. Stay at The Paris or The Palazzo at The Venetian.
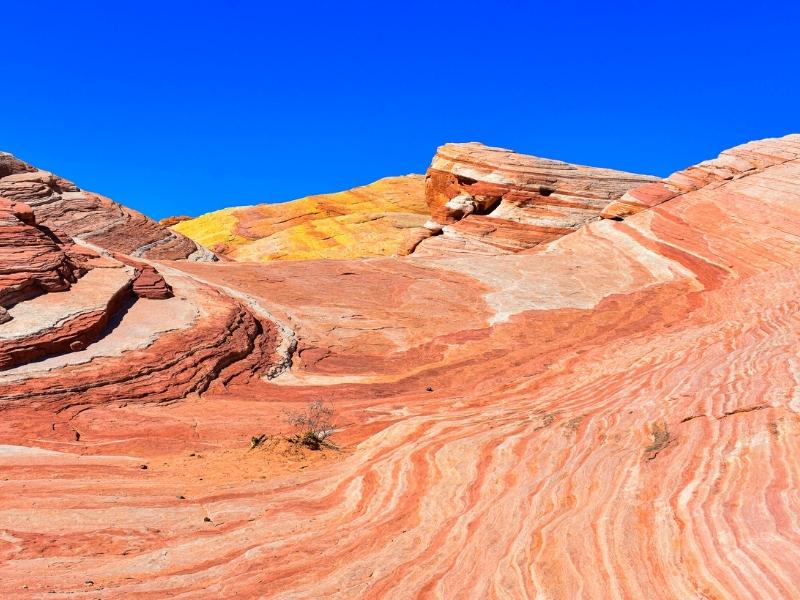
Day 2 – Red Rock Canyon & Valley of Fire
What to Do in Red Rock and Valley of Fire
- Drive 30 minutes to Red Rock Canyon from downtown Las Vegas (arrive at your specific entry time if visiting between Oct 1 and May 31)
- Calico Tanks Hike
- One-way Scenic Drive through the park
- Drive 1hr15min to Valley of Fire State Park (from end of Red Rock one-way route)
- Fire Wave Hike or Rainbow Vista Hike
- White Domes Hike
- Elephant Rock hike, on the way out of the park
- Drive to Springdale, UT – 2.5 hours (and you lose an hour to time zone change)
Our recommendation is to spend the morning in Red Rock Canyon National Conservation Area, drive over lunch to avoid the sun at its highest, spend the afternoon in Valley of Fire State Park, before finally driving up to Utah to spend the night.
>> If you’re visiting in the winter or spring (October through May), timed entry tickets are required for the scenic drive at Red Rock Canyon (most trailheads are along this route). Reserve these online ahead of your trip.
Timed tickets are required for entry between 8AM and 5PM. But if you arrive before 8AM, you don’t need a timed ticket. Something to consider if you want to get in more hikes!
>> If you’re visiting in the summer, swap out the Fire Wave hike for the Rainbow Vista hike.
Due to the exposed nature of the Fire Wave hike and the extreme heat in Nevada in the summers, the park closes the trail from June through September.
Where to Eat
Either pack a lunch or make a quick stop off of the interstate in the Vegas area. Once you get past north Vegas, there’s nothing better than convenience store food.
Reserve some snacks and water in the car for your evening drive.
Once you leave Valley of Fire, there’s a good hour and a half drive before you’ll reach any decent dinner options.
We recommend stopping in St George, UT for dinner, but Springdale is also ok if you know you can make it in time.
Remember, you lose an hour to time zones when you cross the state line. If you leave Valley of Fire at 5PM PST, you won’t get to St George until 7:30 MST or Springdale at 8:30PM MST.
Entrance Fees/Cost for Red Rock Canyon & Valley of Fire
Red Rock Canyon National Conservation Area collects a $15 daily entry fee, plus a $1 reservation fee if you reserve your timed entry online ahead of time.
The America the Beautiful Pass includes Bureau of Land Management sites, too, like Red Rock Canyon. You can get in for free with a pass!
>> Money Saved by the ATB Pass So Far: $45
Valley of Fire State Park charges for day use at $15 per non-Nevada vehicle.
As a Nevada state park, it’s NOT covered by the America the Beautiful Pass. (If you’re a Nevada resident, it’s $10 per vehicle.)
Tips for Red Rock Canyon & Valley of Fire
- Bring LOTS of water and sun protection. There’s a lot of hiking opportunities with minimal shade in both of these parks.
- Red Rock Canyon requires a timed entry ticket for the one-way scenic drive in peak season (Oct 1 – May 31 between 8AM and 5PM).
- Stop at the Red Rock Canyon Visitor Center first, and make sure you know your route before you start the scenic drive. If you miss the parking area for your hike, for example, you have to drive the entire loop and come back around.
Where to Spend the Night
Drive to Springdale, UT, right outside the entrance to Zion National Park.
We’re fans of the Hampton Inn & Suites Springdale/Zion National Park. There used to be a Holiday Inn Express in town, too, but it switched to a Hyatt and is now called the Springdale Zion Inn.
Finding an affordable spot in Springdale can be hard. Refer to our complete guide for where to stay near Zion for other options.
Day 3 – Zion National Park
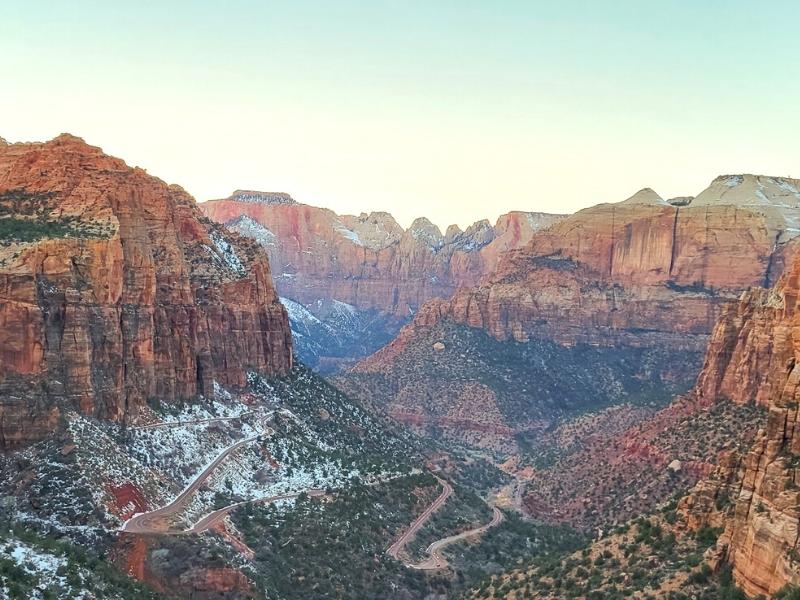
What to Do in Zion
- Start the day hiking The Narrows or Angels Landing (pick one)
- Emerald Pools Trail
- Retrieve your car and drive through the Tunnel to park at the Canyon Overlook trailhead
- Canyon Overlook Trail for sunset
- Drive to Bryce – 2 hours
There’s a lot you can see with a day in Zion National Park. Primarily, though, you’ll be hiking your socks off.
This is Utah’s most popular national park. You will be visiting with thousands of others if you come in the summer.
To help with congestion, shuttle buses are mandatory. No private cars are allowed in the inner canyon, unless you stay at The Zion Lodge.
Exact dates vary but this generally applies May through September and some holiday weekends.
It also means it can take you longer to move around the park. If a shuttle is full, you have to wait for the next one.
We’ve tried to temper the itinerary with this in mind, but if you have more time, feel free to add another hike or two.
Where to Eat in Zion
Packing a lunch or eating at the restaurant at the Zion Lodge (in the park’s inner canyon) is the best way to save time .
You could leave the park and eat in Springdale, which has several options, but that takes time away from Zion activities. Up to you, if the rest is something you want.
For dinner, leave Zion no later than 6PM to get to Bryce before 8PM. In winter, the restaurants in Bryce will all be closed by 8PM. (It’s not a big place.)
Don’t count on finding fast food, either. There aren’t any between Zion and Bryce.
Alternatively, you could eat dinner in Springdale before driving to Bryce after dark. Just remember to take it slow and beware of wildlife once you get on the road.
We saw HERDS of deer along the side of State Route 9 before we made it to US 89. It was definitely nerve-wracking up to that point.
Entrance Fees/Cost for Zion
Zion National Park has a $35 daily entry fee or is covered by the America the Beautiful Annual Pass. The daily entry fee is good for 7 days.
The park shuttle is free, even if you get on in Springdale.
>> Money Saved by the ATB Pass So Far: $80 (officially paid for itself!)
Tips for Visiting Zion
- Mandatory shuttle during peak season. Factor in time for catching the shuttle between hikes and getting back to your car in late afternoon.
- Leave yourself plenty of time to get out of the parking lot, to get up to and through the Tunnel, and to find a parking spot for the Canyon Overlook Trailhead in time for a sunset hike.
- The Angels Landing hike now requires a permit to hike from Scouts Lookout up to Angels Landing.
- Bring a dry bag if you want to hike The Narrows. The water levels in the river can vary from ankle-deep to waist-deep.
Where to Spend the Night
Drive to Bryce (Canyon City) and stay at The Best Western Plus Bryce Canyon Grand Hotel or at Ruby’s Inn (now also owned by Best Western) tonight.
They’re across the street from each other and right outside of the national park entrance. This allows you get a bright and early start tomorrow.
You can explore Bryce Canyon very thoroughly with just one day, if you get started early enough, which is why we recommend overnighting in Bryce rather than another night in Springdale.
However, there are a grand total of 3 hotels in Bryce, and they can get expensive or sell out in peak season.
We researched places to stay near Bryce and suggest a few options in case everything in Bryce itself is unavailable.
Staying another night in Springdale isn’t the end of the world if you can find availability there and not in Bryce. (Pretty unlikely though, as Zion is more popular than Bryce.)
Just keep in mind the morning rush to get into Zion can slow you down on your commute to Bryce. Yes, you will have to drive through part of Zion National Park on SR 9 to get to Bryce.
Day 4 – Bryce & Horseshoe Bend
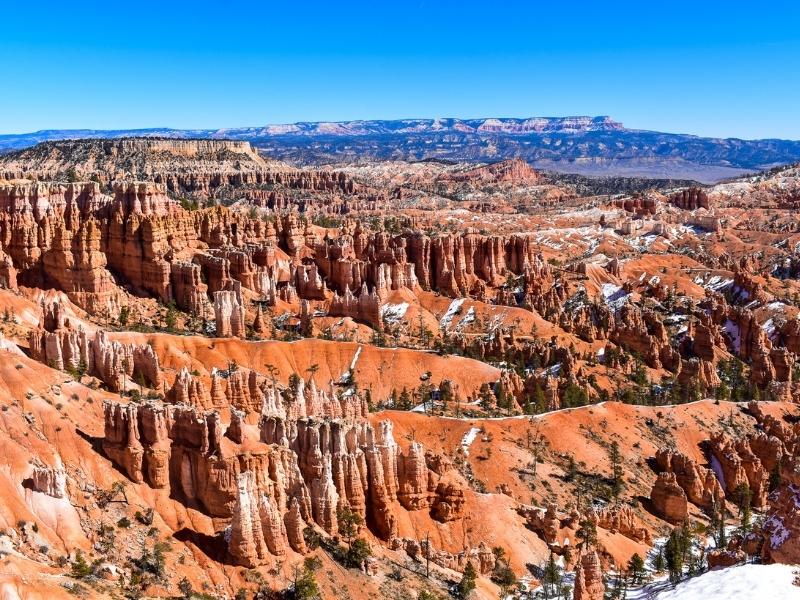
What to Do in Bryce Canyon
- Hike early: Sunrise to Sunset Points
- Queen’s Garden/Navajo Loop
- Rainbow Point Scenic Drive
- Mossy Cave hike, slight detour on the way out of town
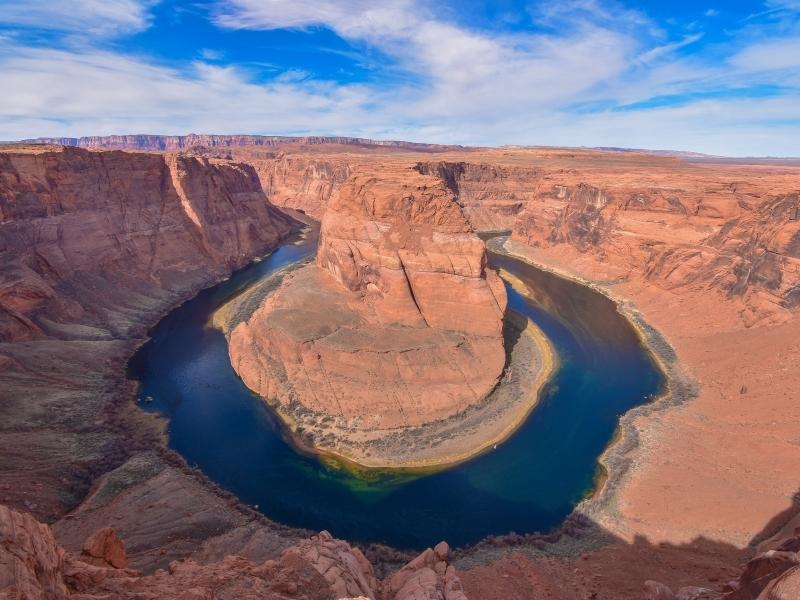
- Drive 2.75hrs to Horseshoe Bend in Page, AZ
- Catch Horseshoe Bend for sunset (or catch it tomorrow, no worries)
Bryce Canyon National Park is Utah’s second-busiest national park out of its Mighty Five. It also gets very busy in summers, but Bryce hasn’t yet made their shuttle system mandatory.
Ordinarily, we’re all about public transit to reduce congestion. But in order to see as much as possible with one day in Bryce, we recommend you bring your own car.
Most travelers can add another hike to this itinerary and still make it to Horseshoe Bend for sunset.
We added Horseshoe Bend to Day 4’s itinerary purely for the sunset enthusiasts. It is gorgeous, but so is visiting during the day, which you will have time to do tomorrow if you prefer.
Don’t feel bad skipping Horseshoe Bend today if you’d rather do another hike in Bryce instead.
Where to Eat in Bryce & Page
We recommend packing in a lunch or eating at one of the restaurants near the Lodge. Leaving to eat lunch in town and re-entering the park after just wastes precious sightseeing time.
For dinner, we’re assuming you stuck to the itinerary and made it to Page.
We ate at the Dam Diner our first night in town, and it was perfect. Good variety on the menu, delicious food, and the décor is on point!
Entrance Fees/Cost for Bryce & Horseshoe Bend
Bryce Canyon National Park also has a $35 entry fee, good for 7 days.
Or, it’s FREE with your Annual Park Pass, and yes, I’m going to keep saying this until it sinks in.
>> Money Saved by the ATB Pass So Far: $115
Horseshoe Bend has no NPS entrance fee, but the City of Page charges a parking fee for their large, maintained, and police-monitored parking lot at the trailhead.
There used to be a huge safety problem here because people would park along the side of the busy highway and cause accidents dashing across the road to the trailhead or pulling out in front of cars when they left.
The city built a parking lot and now keeps a police presence here so people don’t park on the side of the highway. It’s much safer than it used to be.
Most private vehicles are $10. Ubers are considered commercial vehicles, and they’ll charge them $35 to park. Currently, there is no uber drop off zone so you cannot avoid the parking fee.
For more information, read our review for everything you need to know to hike the Horseshoe Bend Overlook trail.
Tips for Visiting Bryce Canyon & Horseshoe Bend
- You need legit hiking boots to hike in Bryce. In winter, you need waterproof boots and spikes you can attach for traction in snow and slush. In summer, you need that ankle support and boot traction as nearly all hiking trails start out steep as you descend into the canyon. (Trust us; we learned this one the hard way.)
- On Bryce’s scenic drive, drive all the way up to Rainbow Point first, and then stop at the overlooks on the way back down. It’s easier for flow of traffic.
- Catch Horseshoe Bend for sunset, but beware of the crowds (the parking lot may fill up) and realize that the canyon bend will be in deep shade. For photos of the incredible orange canyon walls and blue river below, visit tomorrow during the day (but you’ll have to pay to park again.)
- Bring a wide angle lens for photographing Horseshoe Bend with a DSLR camera. Some newer cell phones can get it all in frame, but the ratio will create a serious crop if you try to print it later. The wide angle lens gets the whole bend in frame at a ratio that can be easily printed.
Where to Spend the Night
Stay the night in Page, AZ. The Holiday Inn Express Page or the Hampton Inn & Suites Page/Lake Powell are our go-to hotel chains (hello, loyalty points!) but there are plenty of hotels to choose from in Page.
It’s not a big town. All hotels are close together and equally close to shops and restaurants.
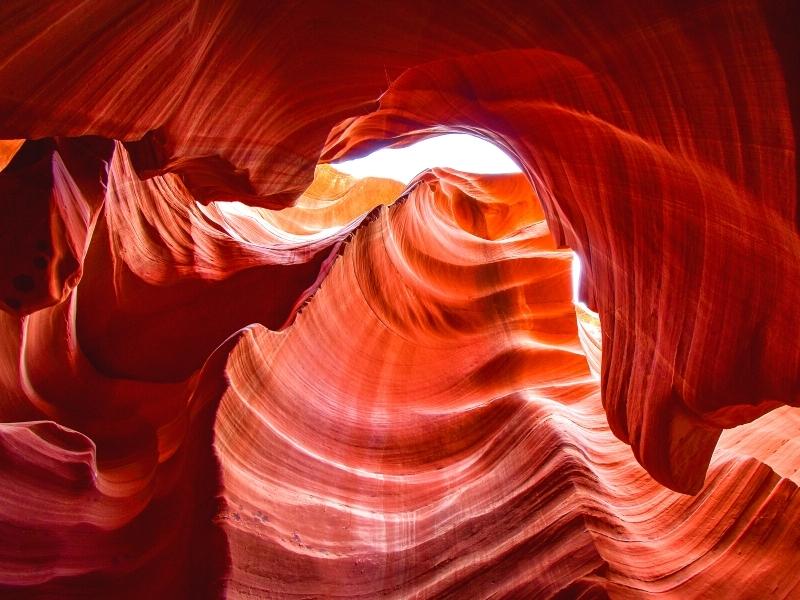
Day 5 – Antelope Canyon, Horseshoe Bend, & Lake Powell
What to Do in Page
- Horseshoe Bend (if missed yesterday or if you want the full-color views)
- Antelope Canyon tour (midday for light beams in Upper Canyon; whenever for Lower Canyon)
- Afternoon at Lake Powell, or drive 2hrs out to Monument Valley and 2hrs back
If you’re new to Antelope Canyon, read this: Upper vs Lower Antelope Canyon: Which is Best to Visit?
It explains the differences between the two, pros and cons for each, and helps you choose which is best for you and your traveling group’s budget, time, and accessibility needs.
Book Antelope Canyon tours as far in advance as you can. They will absolutely sell out months ahead of time.
You can then build the rest of your day around your Antelope Canyon tour time. Horseshoe Bend will only take about an hour, max. That leaves the rest of the day for hiking or boating around Lake Powell.
Glen Canyon National Recreation Area is a sprawling National Park Service site that includes popular spots like Horseshoe Bend, Lee’s Ferry, the Glen Canyon Dam, and Lake Powell.
The most popular areas near Page are Lee’s Ferry, Wahweap, the Glen Canyon Dam, and Antelope Point.
If you opt for the afternoon drive out to Monument Valley, bring lots of water, a few snacks, extra batteries for your camera, and plenty of road trip entertainment.
There is a whole lot of nothing on this drive, except for the amazing scenery.
Where to Eat in Page
Page has a handful of fast food joints for quick eats for lunch, or stop by a grocery store to cobble together an easy picnic lunch while you’re out exploring.
For dinner, ask your hotel concierge which is their favorite restaurant and go there. Big John’s Texas BBQ is a fan-favorite!
Entrance Fees/Cost for Page-area Attractions
Antelope Canyon tour fees vary by time of year and which canyon you visit.
Budget as little as $61 per person for Lower Antelope Canyon in low season to as much as $120 per person for a prime time slot for Upper Antelope Canyon in peak season.
Note that combo tours with other canyons are available in some cases, but will be higher.
Glen Canyon National Recreation Area, which includes Lake Powell, collects a $30 entry fee, valid for 7 days. Once again, it’s also covered by the America the Beautiful Pass if you have one.
Lake Powell’s water levels have been struggling recently. Several marinas, docks, and boat launches are closed due to low water levels. Check the park website before you go to see what’s open.
Lee’s Ferry and the Glen Canyon Dam are pretty much always open, and guided tours of Lake Powell are a good way to let the locals show you around.
>> Money Saved by the ATB Pass So Far: $145
See above (Day 4 – Entrance Fees/Cost) for discussion of costs for Horseshoe Bend. In short, you’ll need $10 to park at the trailhead.
Tips for Visiting Page and its Sights
- Book a midday tour for the epic light beams in Upper Antelope Canyon.
- If you’re visiting in winter, book a cheaper Lower Antelope Canyon tour. The light beams in Upper Antelope aren’t visible in the winter.
- There’s ZERO SHADE at Horseshoe Bend. Bring a wide-brimmed hat and sun protection, no matter the time of year you visit.
Where to Spend the Night
Stay another night in Page and relax a bit.
Day 6 – Grand Canyon

What to Do at the Grand Canyon
- Drive to Grand Canyon National Park’s east entrance – 2 hours
- Take your time to drive the Desert View Scenic Drive to the visitor center, stopping at overlooks along the way
- Park at the Visitor Center
- Walk to Mather Point and along the Rim Trail to Yavapai Geology Museum and back
- Shuttle the Orange Route (Yaki Point); Take a quick hike to the Ooh Aah Point.
- Shuttle the Red Route (Hermits Rest Road); Sunset at Hopi Point
- Drive to Flagstaff – 1.5 hours
Grand Canyon National Park is at the top of most people’s national park bucket lists. It’s definitely a sight to behold that you won’t regret!
We didn’t suggest driving up last night because, when coming from Page, you enter via the east entrance of Grand Canyon National Park.
This happens to be right next to the Desert Watchtower, and the drive to the visitor center from here is the Desert View Scenic Drive.
You want to do this drive during the day so you can stop at all the overlooks along the way.
Once you get to the visitor center, you can shuffle the itinerary however you like based on your lunch needs.
If you packed a lunch, you have maximum flexibility, but if you need a restaurant, you need to shuttle to the Village area or out to Tusayan.
The Orange Route requires a mandatory shuttle ride, year-round. The Red Route requires a shuttle ride typically March through November.
Where to Eat in Grand Canyon
If you follow the itinerary, you should arrive at the Grand Canyon Visitor Center a little before or right at lunch time.
The canyon rim is a fantastic place for a picnic lunch, and you’re close to your car if you need to bring anything back after lunch, like a small cooler.
If you prefer restaurants, shuttle over to the Grand Canyon Village or Market Plaza areas for lunch.
You can also shuttle out to Tusayan for lunch and back into the park in the afternoon, but it’ll cut into your sightseeing time by a couple of hours.
In the evening, if you can wait long enough, eat dinner in Flagstaff. This can be difficult in the summer, since sunset is so late, but it’s doable in the winter.
Alternatively, stop in Tusayan or at one of the restaurants in Grand Canyon Village before heading out for an evening drive to Flagstaff.
Entrance Fees/Cost for Grand Canyon
Grand Canyon National Park charges a $35 entry fee, valid for 7 days, and includes both the South Rim and the North Rim.
Or, you guessed it, visit the Grand Canyon for free with an annual park pass.
>> Money Saved by the ATB Pass So Far: $180 (paid for itself, twice!)
Shuttles around the park’s South Rim are free.
Note: We didn’t include the Grand Canyon North Rim on this road trip itinerary because we’re hitting the highlights and don’t really have time for both rims.
If your main focus is the Grand Canyon and you want to see both rims, we have a whole series of Grand Canyon road trip itineraries you may enjoy, whether you’ve got 3 days or 2 weeks for vacation.
Tips for Visiting the Grand Canyon
- Hopi Point is packed for sunset but many overlooks are good for sunset
- Shuttles for the Orange Route (to Yaki Point) are mandatory all year.
- Shuttles for the Red Route (Hermits Rest Road) are mandatory in peak season, usually March through November.
Where to Spend the Night
This depends on your budget and availability more than on driving distance for tomorrow’s adventures.
Staying in the park at one of the excellent lodges is always pricey but could be worth the splurge for the views.
Tusayan is right outside the park’s southern entrance, so the convenience factor is high. Prices are correspondingly high and availability is often scarce.
Flagstaff is 1.5 hours from the southern entrance and will always be cheaper and have more availability. Williams is another possibility, slightly closer to the park but fewer hotel options.
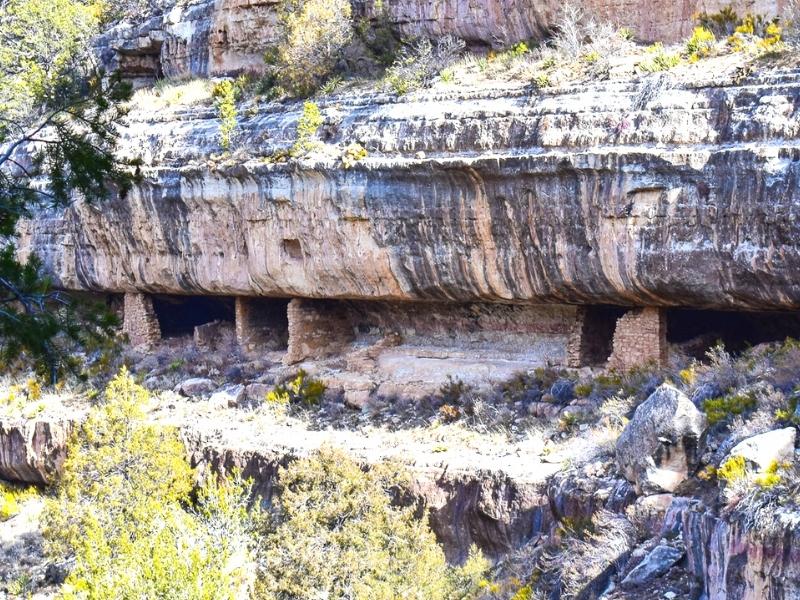
Day 7 – Walnut Canyon & Hoover Dam
What to Do
- If you stayed in Flagstaff, start at Walnut Canyon National Monument to view Native American cliff dwellings.
- Hike the Island Trail.
- Consider hiking the Rim Trail, if you have time.
- Drive 3.5hrs to Hoover Dam (Tours and shops operate on PST, so you gain an hour on the drive)
- Tour Hoover Dam
- Stop for a quick walk out onto the bridge for an iconic Hoover Dam pic
- Continue on to Las Vegas (45 min drive) or one of the suburbs, to your hotel for the night.
Day 7 is sort of a catch-all day for this Southwest USA road trip itinerary. There are a lot of different ways you can spend the day, so long as you end up back in Vegas when it’s all said and done.
Our suggested itinerary above includes more Southwest US must-see sights, but you could spend another half day in Grand Canyon National Park before heading back to Las Vegas in the late afternoon/evening.
Or, there’s the Route 66 Museum in Kingman or a detour out to the Grand Canyon Skywalk on the way back to Vegas.
Maybe you want to beeline back to Vegas and enjoy some down time in a legendary Las Vegas hotel pool, or do some sightseeing in Vegas.
These are all good ideas. Pick whatever suits you best!
Where to eat
Kingman, AZ is a good stop for lunch on the drive back to Vegas. If you follow our itinerary, you should arrive around noon-ish.
Whatever your plans for Day 7, we recommend being back in the Vegas-area for dinner. There is always something open in Vegas.
Entrance Fees/Cost
Walnut Canyon National Monument is $25 entry, valid for one week. But also, it’s covered by the America the Beautiful Pass and could be free for you!
>> Money Saved by the ATB Pass So Far: $205
Hoover Dam tours are NOT covered by the America the Beautiful pass.
Hoover Dam is operated by the Bureau of Reclamation, not the Park Service, and is actually self-sustaining from its ticket sales.
Visiting Hoover Dam can be free if all you want to do is stop and take a picture.
Park at the Bridge Overlook Parking lot, walk up the paved path and along the side of the Pat Tillman Bridge, and get that iconic photo of Hoover Dam. Then walk back to your car and leave.
We highly recommend the in-depth Guided Dam Tour for $30 per person, for all the fascinating stories and details about how this colossal engineering marvel was built with 1930’s technology.
You go inside the dam, see the power plant, see the inspection tunnels, and even get a picture through one of the vents in the middle of the dam.
Hoover Dam also offers a self-guided tour of the visitor center for $10 or a Guided Tour of the Power Plant Only for $15. (Both guided tours include access to the self-guided visitor center tour.)
The parking garage on the Nevada side and Parking Lot 9 on the Arizona side are both $10 flat fee (not hourly).
Parking in the upper lots on the Arizona side is free, but it is a bit of a walk down to the dam, the visitor center, and the shops.
Tips for Visiting Walnut Canyon & the Hoover Dam
- Walnut Canyon’s Island Trail begins and ends with several flights of stairs. There are benches to rest, but it’s not a mobility-friendly trail.
- Hoover Dam’s Guided Power Plant Tour and Self-Guided Visitor Center Tour tickets are both available for advance purchase online. They often sell out!
- The in-depth Dam Tour tickets are NOT available online. You must be present in person to buy those tickets, first come, first served.
Where to Spend the Night
Las Vegas, or one of the surrounding suburbs with easy access to the airport but cheaper hotels.
Reminder, The Palazzo at The Venetian accepts IHG rewards points. #gamechanger
Enjoy exploring the Southwest on this Las Vegas Road Trip Loop!
Whether you spend a week on this road trip or extend it to 9 days for some extra Vegas sightseeing, we hope this Southwest USA road trip was a good introduction to the region and inspires you to come back!
Recap of helpful resources for planning your Vegas road trip loop:
- 35 Fun (and Sober!) Things to Do in Las Vegas
- One Day in Death Valley National Park
- Where to Stay near Zion
- Where to Stay near Bryce
- How to See Everything in Bryce Canyon National Park in One Day
- Upper vs Lower Antelope Canyon: Which is Best for You?
- What to Expect on the Horseshoe Bend Hike
- One Day in Grand Canyon National Park
- 8 Epic Grand Canyon Road Trip Itineraries
Happy travels!

About the Author: Rachel Means
With six-figure student loan debt and only 10 PTO days per year, Rachel started traveling the world. A decade later, she’s paid off her loans, changed careers, and been to 42 US states and 17 countries. She’s an expert at planning and budgeting for travel and loves to help others do it, too! Read her full story here.
Share it!